Finding a rock that you think may contain gold is an exciting experience. Maybe you’ve noticed some gold colored flecks or banding or it’s heavier than you would have expected. In any case, if you’ve found a rock that potentially contains gold the next step is to run some tests and verify. Testing a rock for gold isn’t something you do every day, so it’s not easy to know how to go about it. Having gone through this process a few times, I decided to put together this guide to help anyone wondering how to test their rock for gold.
To test a rock for gold, first perform nondestructive visual inspections and tests for weight and magnetism. You can also use destructive methods such as testing hardness, streak, ductility, or pulverizing and panning the powder. You will need a scale, glass, unglazed ceramic, and a powerful magnet.
Each of these methods will give you a new piece of information about your rock that, together, will tell you pretty definitively if your rock contains gold. You don’t necessarily have to do every test, but the more you are willing and able to perform the more confidence you can have about the gold content of your rock. I’ll go into detail about the order you should do the tests and how to properly perform each one.
| Test | Type | What to Look For |
|---|---|---|
| Visual | Nondestructive | Non-cubic mineralization, gold color |
| Hardness | Destructive | Gold won’t scratch glass |
| Streak | Destructive | Gold leaves a golden streak |
| Weight | Nondestructive | Gold is heavier than other rock |
| Magnetism | Nondestructive | Gold is not attracted to magnets |
| Ductility | Destructive | Gold is easy to deform and cut |
| Panning | Destructive | Gold settles in the bottom of pan |
How to Test a Rock For Gold
Visual Inspection
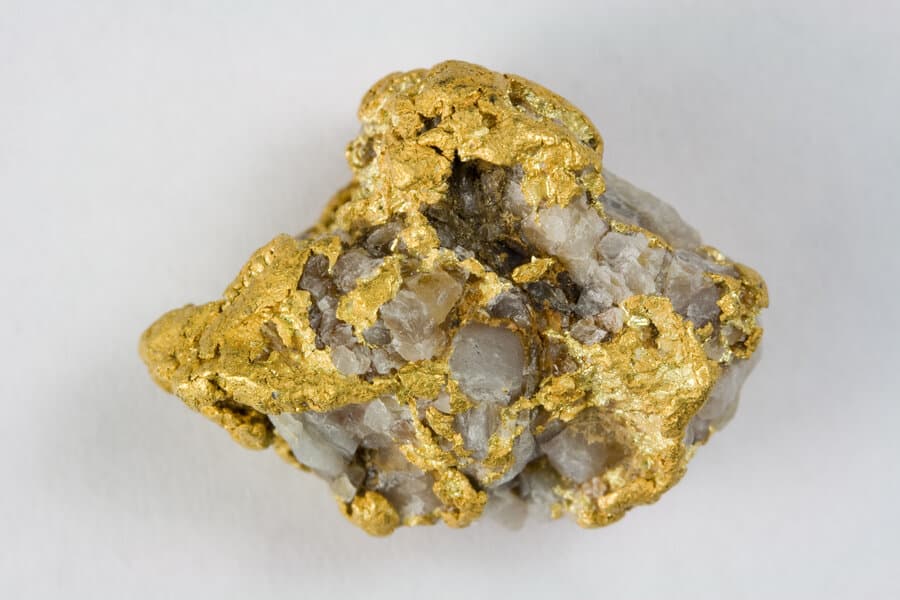
If you’ve found a rock that you suspect may have gold in it, it’s probably because you have noticed that the rock has some gold-colored flecks or banding. Before performing any of these tests, take a good look at the rock and make sure you know what to look for.
The first thing you should do is make sure the surface of the rock is relatively clean. Removing any loose dirt will make visual identification easier and should be performed before running the rest of the tests anyway. Real gold is most commonly confused with pyrite (fool’s gold) and in order to differentiate between the two we need to be able to properly see the mineralization.
Real gold can be differentiated from pyrite by its lack of crystalline structure and more pronounced yellow-gold color. Pyrite has a distinct cubic crystal structure, while real gold usually appears smooth and irregular. The difference in color can be difficult to distinguish without seeing gold and pyrite side by side, but pyrite usually appears a bit brassier and tends to tarnish compared to the bright golden-to-silvery yellow of real gold.
Visual identification of gold can be difficult, especially if the potential gold presents itself as tiny flecks in the rock matrix (usually quartz). It can be useful to have a 10x magnification gem loupe to give you a better look at the crystals. I’d recommend this one from Amazon that has an LED light and is incredibly affordable.
Hold the rock close to your face and look at the individual flecks with the gem loupe and see if you notice any cubic mineralization that would indicate they are pyrite. In most cases, though, it will be necessary to perform more tests.
Measure the Weight & Volume
This test is a fun one! Gold is significantly heavier than just about any rock that you’ll find it in, most notably quartz. In fact, with a density of 19.3 g/cm3 it’s over 7 times heavier than quartz and almost 4 times heavier than pyrite!
| Mineral | Density (g/cm3) |
|---|---|
| Gold | 19.3 |
| Quartz | 2.65 |
| Pyrite | 5 |
What we’re really trying to calculate with this test is the density of the rock. We’ll need two measurements to do this: weight and volume. Weight is easy enough. I like to use my food scale that has enough precision to measure to the weight down to tenths of a gram.
The volume is a little trickier. I like to use my large 2-cup measuring cup. Fill it up about halfway and then place the rock in the water (assuming it’s small enough to do so). You can measure how big the rock is by how much water is displaced. If the water line moves up 3/4 of a cup then that’s how big the rock is. You can use Google to convert that volume to cubic centimeters.
Once you have the weight and volume, calculating the density is easy. Density is just the weight divided by the volume. If the density is at or very close to 2.65 g/cm3 then you probably just have a hunk of quartz, but if it’s significantly heavier then there is a good chance the rock contains gold.
Since pyrite is about twice as heavy as quartz it can be hard to determine if the gold colored material in your rock is pyrite or quartz, but the denser your rock is the greater chance there is that it contains gold. The density will also vary depending on the amount of pyrite or gold within the rock. This method is best used in conjunction with other tests in this list.
Test for Magnetism
Another very easy test you can run on your rock to test for gold content is to check for magnetism. Gold is not magnetic, nor is it attracted to magnets. Pyrite, on the other hand, is attracted to magnets because of its high iron content.
The effectiveness of this test will depend quite a bit on the amount of ‘gold’ in your rock. If there are only trace amounts then this test will be less reliable because if those ‘gold’ specks are actually pyrite then there may not be enough of them to display much magnetism. You may not feel any effect on the magnet and therefore assume that it means they are real gold, when in fact there just wasn’t enough pyrite to register.
If you choose to test your rock with a magnet I would recommend getting a good rare-earth magnet from your local hardware store. These magnets are extremely powerful and will give you a much better indication of whether your rock contains pyrite or not. A common magnet that you pull off of your refrigerator will probably not be powerful enough to react to trace amounts of pyrite.
It’s important to remember that a magnetism test will really only tell you whether or not your rock contains pyrite (or another ferrous, magnetic mineral). Just because you detect pyrite doesn’t necessarily mean that your rock doesn’t also contain gold. In fact, pyrite often forms along with gold (we call them ‘associated minerals’) so not only does the presence of pyrite not negate the possibility of gold, it may actually increase your chances.
Test the Hardness
So far all of the tests we’ve run have been completely nondestructive, but if you’re still uncertain about whether or not your rock contains gold it’s time to get a little more aggressive. One of the easiest and most telling tests for gold that you can perform on your rock is for hardness. This test is an application of Mohs hardness scale, which compares the hardness of different minerals by scratching them against one another.
Gold has a hardness of about 2.5 to 3 (on a scale of 1-10), meaning it is very soft. In contrast, pyrite has a hardness of 6 to 6.5, while quartz (the most common mineral in which gold will be found) has a hardness of 7.
To test for gold you’ll need a piece of glass or a mirror that you don’t mind scratching. Take your rock and try to find a part of it that has some of the possible gold sticking out on an edge or point. If you can’t find an adequate spot to use you may want to consider breaking the rock with a hammer to expose new parts of the rock or skipping this test altogether.
Tip: If you don’t have a suitable piece of glass, you can use a copper penny in a pinch. Pyrite and quartz will scratch it, while gold won’t.
Once you’ve found a suitable spot on the rock to test, rub it in a straight line on the glass for about 2 inches. You’re looking for a scratch on the glass. If the glass gets scratched from the ‘gold’, it’s not actually gold. Since glass has a hardness of around 5.5 it will only be scratched by harder minerals like pyrite and quartz. If the glass doesn’t scratch then that’s a great sign – you likely have gold in your rock!
If your glass does scratch make sure that the scratches are coming from the ‘gold’ and not the surrounding rock. Look very closely at what parts of the rock are making contact with the glass. It’s possible that the surrounding rock matrix is also making contact with the glass and leaving a scratch, while the gold isn’t leaving any marks.
Perform a Streak Test
Streak tests are another common method used in mineral identification. When rubbed against a streak plate (unglazed ceramic tile) minerals will leave a distinct color streak behind which can aid in the identification process. Gold leaves a distinct yellow streak, whereas pyrite leaves a rather ugly greenish-black streak.
To perform the streak tests you’ll need a piece of unglazed ceramic tile, such as the back of a piece of bathroom tile. It’s important that the ceramic is not glazed because it needs to be rough and abrasive enough to wear away the mineral being tested.
Just like you did for the hardness test, you’ll need to find an edge or point of your rock where the ‘gold’ you’re testing sticks out enough to be able to rub it on the streak plate. Unlike the hardness test it’s okay if you rub some of the matrix rock along the streak plate as well. Quartz and pyrite are a little harder than the ceramic and might scratch and gouge it, so you can effectively push the rock into the plate to get the ‘gold’ in contact with it.
Rub the rock along the streak plate for an inch or two and look at the color of the streak. If it leaves a really nice yellow-gold streak then you’re in business – you’ve likely found real gold! If the streak is any other color – particularly the dark green-black that pyrite leaves – then you’ve found pyrite or some other mineral.
Test Ductility and Sectility
If the potential gold in your rock is in large enough pieces one of the easiest and most telling methods to test for gold is checking how ductile it is. Real gold is much softer and more malleable than pyrite or other possible minerals like chalcopyrite or biotite.
This test is pretty simple. Find a decent sized chunk of the ‘gold’ and see if you can dent or bend it with your fingernail. If it yields to your fingernail then it is almost certainly gold. The other potential minerals are much harder and more rigid and won’t deform by you just pressing into it with your fingernail.
Similarly, real gold also displays a high amount of sectility. If you’re like me and had never heard that word before, that means it is easily cut! If you can find a sufficiently large piece of the ‘gold’ in your rock (it can be the same one you used your fingernail on), take a steel razor blade or very sharp knife and attempt to cut into it. If the blade slices through then you have found gold! If not, it’s more likely that you’re looking at pyrite or some other mineral.
Crush the Rock and Pan the Powder
By far the most destructive test on this list, only attempt this if you’re okay with your rock being completely destroyed. This test involves crushing the entirety of the rock into very small pieces and then essentially panning for gold with the remnants.
You’ll need a gold pan, which are pretty cheap and are readily available online. You’ll also need a way to crush and grind up the rock. I would recommend starting with a good rock hammer and then moving on to a mortar and pestle. If you’re looking for a good rock hammer I’d recommend the Estwing 22 oz rock pick that I wrote about here.
After you have ground the rock down to very fine grains then you just need to put it in the gold pan and fill it with water. Swirl it around until the material has sorted out. If your rock contains any gold it will have settled into the bottom of the pan. Remove the other material and you’ll be left with the ‘gold’. You can be even more sure that you have gold by checking the dust with a magnet.
Bring the Rock to an Assayer
If all else fails, or you don’t have the ability to do any of these tests yourself, you can always take your rock to an Assayer. These are professionals that have been trained specifically for this task and they will be able to perform all of these tests and more to tell you all sorts of things about your rock and its gold content.
Still, I would generally advise against taking your rock to an Assayer. The fact is, finding a rock with significant gold content is a pretty rare occurrence, even if you’re specifically looking for it. And even if you do find a rock with gold in it, the amount contained within the rock is not likely to be worth the cost of hiring an Assayer and extracting the gold.
If you have run some of the tests I’ve discussed and you think your rock contains a decent amount of real gold then it might be worth taking it to an Assayer. They can give you a better idea of the quality of the gold and what your rock may be worth. That will tell you if it’s worth returning to the place you found your rock and possibly even staking a mining claim.
A Note on Acid Tests
I have seen several websites recommending performing an acid test on your rock as part of the gold testing process. In my experience this is not an effective or advisable test. The method I commonly see prescribed is to submerge the rock in vinegar or some other common acid and leave it for a while. The quartz and pyrite are then supposed to dissolve or break up in the acid, while gold remains completely unaffected.
This method just isn’t well founded in science and in my opinion is a complete waste of time and money, all while being potentially dangerous. Quartz doesn’t react to most common acids – in fact, many acids such as vinegar, oxalic acid, and muriatic acid are often used to clean quartz and remove iron stains. Pyrite may or may not react to the acid depending on its exact species. It’s just not worth performing this test on your rocks.