Rockhounding is a favorite activity of enthusiasts all around the world, but trust me when I say it is much more enjoyable if you have the right equipment. I decided to put together this guide to help people make sure they have everything they need to have a productive and pleasant trip to the field.
Not all of these items are absolutely necessary, but if you plan to get serious about your rock and mineral hunting it would be wise to begin investing in this equipment. Depending on what you’re looking for and where you’ll be looking some of these tools will be more more useful than others.
Internal Frame Backpack
This is one of the most important pieces of equipment you can own in my opinion. It provides an easy and comfortable way to transport the rest of your equipment and the most convenient way to bring your samples back out of the field
A wire framed hiking backpack is definitely worth the money. You can get by with a normal school backpack or even a bucket if necessary, but the longer you are in the field the more you’ll wish you had a decent backpack. They are simply more comfortable and useful than the alternative.
I have a great Osprey day pack that contains a camelback for water and distributes the weight on my hips. It also has a mesh membrane that separates the bulk of the backpack from my back, drastically reducing the amount of sweat (a must for a sweaty guy like me!) I wrote about how much I love this backpack here.
These backpacks also tend to have a lot of handy little pockets on the front of the straps that make accessing your tools a lot faster and more convenient. It’s nice not to have to take off your pack every time you need to grab a snack or use a tool.
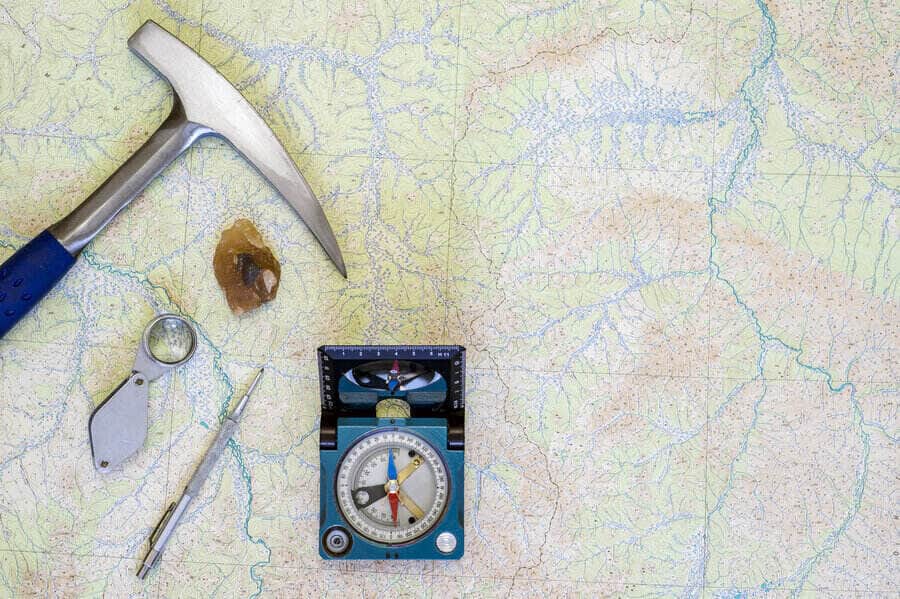
Rock Hammer / Pick
This is a rockhound’s best friend and is as close to essential as you’ll get in this list. There are a wide variety of rock hammers to choose from. To start with, just get a general use hammer that you can use in most situations. For most rockhounds, a 2 to 4 pound hammer with a pick or chisel will be a great place to start. The rock hammer that I personally use and recommend is the Estwing 22 oz rock pick. You can read my full review of it here.
You’ll want to choose a hammer that is appropriately sized for you and for the jobs you expect to be doing. If you’re a small person it’s probably best to avoid a large hammer that you’re not going to be able to swing all day. Similarly, if you think you’re going to be busting up boulders all day I wouldn’t recommend a tiny hammer.
If you’d like to learn more about how to properly use a rock hammer in the field I would recommend checking out this guide I wrote.
Chisel
A good chisel pairs very well with a rock hammer. Carbide-tipped chisels are the most recommended, but are more expensive than a normal chisel. The upside is that the carbide tip is harder and more durable. You can decide which you’d prefer – either will work.
Chisels can be used to score and break difficult sections of rock, making it easier to collect your samples. Striking the chisel with your hammer with concentrate all of the energy to one point, ensuring that the rock will break at the exact point you intend.
Multitool or Pocketknife
My multitool has saved my bacon more than once in the field. The thing about it is that you never know exactly why you might need it beforehand, but it almost always comes in handy.
A knife has obvious and numerous applications when you’re wandering around in the wilderness, but the other functions of the multitool are also super useful. For example, I’ve used the pliers on my Leatherman tool to grab hold of a piece of cactus that got stuck in my leg and pull it out!
Pocket Tools
Almost all experienced mineral collectors will keep these tools in their kit. A long flat-head screwdriver (preferably a foot long or longer) can be super useful when trying to reach specimens in pockets you can’t access by hand. I’d also recommend some needle-nosed pliers to be able to grab samples in small places.
Pro Tip: Spray paint all of your more expensive or easy-to-lose items a bright color to avoid losing them in the field
Eye Protection
If you’re going to be hammering on rocks on day you’d better be wearing some eye protection. Rock and metal fragments can (and often do) go flying and can do some serious damage. Get some safety glasses and wear them any time you’re doing this kind of work.
Sunglasses are, of course, a near must-have if you’re going to spend all day outdoors. You can get by without them but nobody wants to be squinting into the sun all day. Get a pair that fits snugly or at least has a strap on them to prevent them from falling off your face when you’re bending over.
Gloves
Depending on how much work you’ll be doing it is probably smart to have a pair of heavy duty gloves. I prefer leather, but any decent pair of work gloves will do. They’ll help prevent blisters when you’re hammering all day, and prevent scrapes if you’re handling a bunch of rocks or reaching into crystal-lined pockets all day.
Gem Loupe
This isn’t really a necessity but any self-respecting rockhound will proudly sport a gem loupe around their neck. It’s nice to have one handy to get a good look at the specimens you collect in the field.
Local Field Guide
A good local field guide can be your best friend in the field. If possible, do some research before you head out and see if you can get a hold of a field guide. It will likely have extremely useful information on exactly where to go and what to look for.
GPS / Compass & Map
In many locations your phone will be good enough, but when rockhounding we often get off the beaten path where cell service can be spotty at best. For safety’s sake it’s smart to have a dedicated satellite GPS device. If that’s outside your price range and you’re capable of some old-school land navigation then a compass and quality topographic map will suffice.
Camera
Again, this is usually covered by the cell phone in your pocket. However, some people like super high quality photos so a good camera is well worth the investment. This will help document your trip and help you remember exactly where you found each sample. Plus you get to share pictures of your adventures with your family and friends!
Field Shovel
This really depends on the type of work you’ll be doing, but if you plan on digging through any old mine dumps, river beds, or dirt, then you’ll definitely need a good shovel. You don’t want anything too large because it’ll be too heavy and clumsy to carry with you, but it needs to be big enough to get the job done. I’d recommend a sturdy collapsible field shovel that you can attach to the outside of your pack, like the one I personally use (link to Amazon). You can read my full review with tips on how to use it here.
Stiff-Bristled Brush
This is a tool that often goes overlooked but is one of the items in my kit that I use the most. Often times your samples will be coated with dirt, dust, and debris, and a good stiff brush can go a long ways towards cleaning them up in the field. It can help you determine if a sample will be worth keeping or if it’s just dirt all the way down.
Masking Tape
Masking tape or painter’s tape is super useful to label your samples in the field. It is very frustrating when you get back from an excursion and you can’t remember exactly where each sample came from.
Once you find a sample you intend to keep, just slap some masking tape on there and write down where you found it (GPS coordinates, locality description, etc). This way you’ll always be sure about where each specimen came from.
Newspaper & Sample Boxes
It is essential to protect your specimens while you’re still out in the field. If you wrap each sample in newspaper you can then put them in your backpack without fear of them rubbing together. For your more fragile specimens make sure to have some sturdy boxes or sample tubes to pack them in. It would be a shame to come home to crushed mineral samples!
Sunblock & Insect Repellant
This goes for any outdoor activity, but these items can make or break a trip to the field. Nothing can ruin your day like getting fried in the sun or being constantly swarmed by bugs. Just keep these things in your pack and use them liberally throughout the day – you’ll be glad you did.
First Aid Kit
A good hiking first aid kit is a smart addition to your field kit. You never know what will happen when you’re out wandering around so having some basic medical supplies is a good idea. Band aids, mole skin, and any necessary medication are just some of the things you definitely want to have with you.