Geodes are one of the coolest things that anyone can find in nature. Every rockhound I know loves to look at them and peer inside at the crystals. They are pretty much an essential part of any aspiring geologist’s rock and mineral collection. The problem is that if you find a potential geode in nature you might not be able to tell if it’s actually a geode or not. So how can you tell if a rock is a geode?
- Learn about the locality
- Check for a roughly spheroidal, rounded shape
- Look for a bumpy textured surface
- Give the rock a listen
- Break it open
- Geodes vs Nodules and Thundereggs
- Identify the minerals inside
It will usually take most or all of these methods to determine if you’ve found a geode. You’ll probably want to go through these steps in sequential order, but every experience is fun and unique. I’ll break down each one of these steps, and by the end, you’ll know if you’ve found a geode or not!
1. Learn about the locality
Geodes are surprisingly common… as long as you’re in the right spot. If you’re out walking around the park and you spot a nice round rock, chances are that that is all it is. Geodes only form in specific places, so unless the area you’re in is well known for producing geodes I’m afraid that the likelihood of you finding one is pretty much zero.
The reason geodes aren’t found just anywhere is because they only form in very specific geological settings. They are either are formed in old volcanic ash beds and lava flows or in certain types of carbonate deposits (dolomites and limestones).
In both cases, the geodes form because large voids are created in the surrounding rock and subsequently filled in with crystals as mineral-laden water precipitates into them. Looking in or near these types of beds will be your best bet for finding geodes. If you aren’t anywhere near volcanic or carbonate beds then it is very unlikely that your rock is a geode.
There are several areas in the United States that are well known for producing geodes. Some of the more well-known geode beds in the United States include (but are not limited to):
- The Hauser Geode Beds in southern California – probably the most prolific geode beds in the United States
- Lake Superior – known for its spectacular agates, some of which are not completely filled in
- Northeastern Missouri – the Keokuk Geode Beds, extending into neighboring Iowa and Illinois
- Utah – the Dugway Geode Beds produce some very unique geodes
If you aren’t in an area known for producing geodes then it’s safe to assume that the rock you’re wondering about is not a geode. However, if you do happen to be in one of these areas (especially if you’ve intentionally sought them out) then you may very well have found something special. We’ll move on to the next steps which involve observing the outer appearance of the potential geode.
2. Check for a roughly spheroidal, rounded shape
The shape of a rock is one of the best indicators of whether or not it could be a geode. Due to how they are formed, geodes are almost always pretty well rounded. Most are roughly spheroidal, but there are plenty of geodes that are egg-shaped or even far more oblong than that.
Geodes are rarely pointy or angular on the outside. If the rock you’ve found has a lot of points, edges, or severe angles then I’m afraid that almost completely rules out the possibility of it being a geode. You can also rule out anything that is very narrow or skinny – it needs to have enough space between the edges to allow crystals to grow inside.
Most geodes that people will find in the field will be roughly baseball-sized, although that doesn’t rule out the possibility of finding specimens that are smaller or much larger. As geodes get larger you can get more variability in the shape. While they may be more elongated or complicated in shape, they will still be rounded and lacking any sharp or angular features.
3. Look for a bumpy textured surface
The shape of a rock isn’t the only visible indication of whether or not it’s a geode. If you’ve found a geode it will usually have a lumpy, bumpy sort of texture on the outside. It is very rare for a geode to have a smooth exterior, so if your rock feels smooth to the touch then I’d bet against it being a geode.
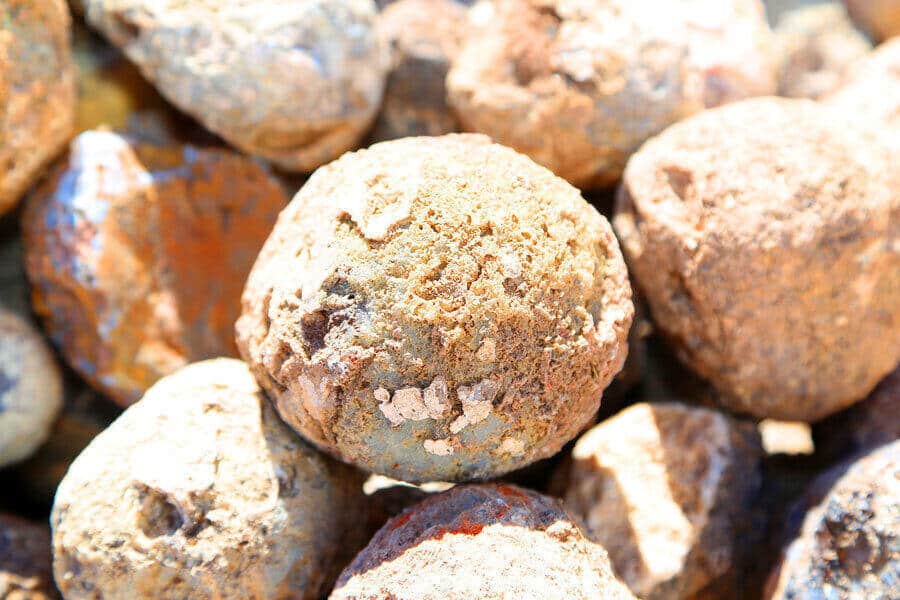
Geodes are actually pretty ugly rocks! But as we all know, real beauty is on the inside. Geodes tend to be pretty dull in color and just generally don’t have very pretty exteriors. Sometimes if you look close you may be able to spot little veins of the crystal inside showing through to the exterior, but overall a geode will look very bland and even ugly.
Tip: Geodes tend to be fairly ugly rocks at first glance. Don’t expect to see any pretty crystals on the exterior
The exterior of a geode tends to be well-weathered and pockmarked. When a geode is formed it is encased in surrounding rock, but that rock it’s encased in will eventually we eroded away. The geode remains because the minerals it’s made of are harder than the rock it was encased in.
The bumpy texture of the exterior is one of the best giveaways that you’ve found a geode. The bumps will be fairly large. When I say ‘bumpy’ I don’t mean ‘gritty’ or crystalline. The lumps and bumps look almost organic, and are unmistakable once you’ve seen them. They should help make identifying a potential geode a lot easier once you know what to look for.
4. Shake the rock & listen
The previous steps probably didn’t take you very long. All you’ve really needed to do was look at your rock and if it’s fairly well rounded and sort of lumpy looking. If it meets those requirements then it’s time to really get down to business!
One dead giveaway of a geode is if it makes any noise when you shake it. Jiggle your rock around close to your ear and listen for any movement inside. If you hear anything jostling around inside then you can be sure you’ve found a geode. That sound is a sure sign that there is empty space within the rock for material to move around in.
Tip: Shake a potential geode and listen for movement inside. This is a sure sign you’ve found a geode.
Not all geodes will make noise when you shake them, though. There may not be any loose material inside, or what material there is might be too small to be audible. If you don’t hear anything then it’s time to move on to the next sound test.
Tap the rock on the ground (preferably some hard rock or pavement) and listen to the sound. You’ll want to listen for a hollow sound. This is sort of like thumping a watermelon to see if it’s ripe – hard to know exactly what it is you’re listening for but once you hear it you’ll probably know.
If you’re having difficulty determining if it sounds hollow or not, look for another rock to test it against. Try to get another rock that is similar in size and makeup, then hit it against the ground in the same place. Listen to what it sounds like and compare that to what you heard when you tapped the geode there. If the comparison rock sounds more solid that your potential geode then that’s a good sign.
While you’re at it, just hold the two rocks together – one in each hand. If they are about the same size then you should probably be able to tell if your potential geode weighs the same or less than the comparison rock. Note that if they weigh about the same that doesn’t necessarily mean that you don’t have a geode – it may just mean that the interior is mostly or entirely filled with crystals.
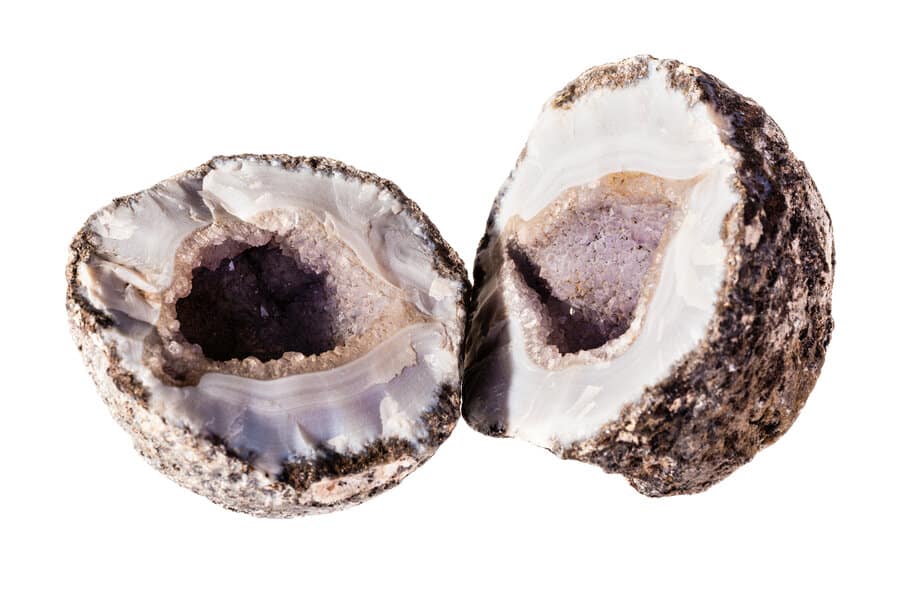
5. Break it open
By now you might have a pretty good idea of whether or not you have a geode on your hands, but the only way to be 100% sure is to break it open and have a look inside. This is the really exciting part! Opening up a geode yourself means that you will be the first person to ever see the beautiful minerals inside. They are like nature’s little treasure boxes.
Tip: Make sure to wear proper safety equipment when breaking rocks, especially safety glasses.
There are a few ways to go about opening up a geode, and which one you choose will depend on what tools you have available and what you want your finished product to look like.
How to crack open a geode:
- Use another rock: This is the simplest method that anyone can use. Just set your geode on the ground, grab a large nearby rock, and strike the geode hard. Be sure not to hit your fingers, and always be sure to wear eye protection with any of these methods.
- Hammer: If you’re into rockhounding at all, you should have a rock hammer in your tool kit. If you’re wondering which one to get, you should get the Estwing rock pick I wrote about here. Just place your geode on the ground and give it a good strike with the blunt end of the hammer. Some people like to put the geode in a sock before doing this in order to prevent rock chips from flying everywhere.
- Hammer and Chisel: This is one of my favorite methods to crack open a geode because it results in a little cleaner edge than the blunt force methods above. Take a chisel and place it on the geode, then lightly tap it with a hammer to score the surface. Do this in a line all the way around the geode, then hit it hard to break the geode along the scored line.
- Ratchet Chain Pipe Cutter: This is a very efficient and easy method but you need to have the cutter available to you. Just place the geode inside the chain loop and ratchet the chain down tight. It will eventually break the geode in a pretty clean line where the chain is applying pressure.
- Lapidary Saw: This is the professional way to break open a geode and is the one that will produce the cleanest, most polished finished product. A lapidary saw uses a diamond-edged blade to cut through the geode and will produce a beautiful end product.
Read my complete article on how to properly use a rock hammer
Once you’ve split the potential geode in two, it will be readily apparent if you’ve found a geode. There should be some open space inside and hopefully that space is partially filled with beautiful crystals. If it is completely filled with crystals you may have still found something very cool, which leads us into the identification phase.
6. Know the Difference Between Geodes, Nodules and Thundereggs
Every rockhound would love to find a geode in the wild, but there are some very close relatives that are almost as cool. When geodes form, crystals slowly grow inside the empty space and line the walls. But when the crystal growth is big enough that space can become entirely filled up with crystalline material. Once there is no more space inside it ceases to be a geode.
When a geode becomes completely full it is called a nodule or a thunderegg, depending on the setting it is found in. Most completely filled former geodes can be classified as nodules. A thunderegg is a specific geological structure and they are found in rhyolite volcanic beds. They can sometimes also be geodes if they still have cavities, but most are solid agates.
Regardless of whether or not your rock had a hollow interior, you have hopefully exposed some beautiful crystalline material. It can be very exciting to expose colorful and shiny minerals from inside a rock that was so dull and seemingly worthless at first glance. If you’ve exposed some minerals then you’ll undoubtedly want to know more about your geode by figuring out exactly what the crystals are.
7. Identify the minerals inside
Hopefully, you have discovered some beautiful crystals inside of your rock. Geodes can contain quite a variety of minerals and it’s not always easy to know what you’re looking at. The exterior of geodes is most commonly made of chalcedony, which is a microcrystalline variety of quartz. Here are some of the most common minerals contained within geodes and how to recognize them.
- Quartz – This is by far the most common mineral found in geodes. It is usually whitish in color and forms hexagonal crystals with nice pointed ends.
- Amethyst – This is a variation of quartz that is easily recognizable by its purple color. If you’ve found a geode containing amethyst you are extremely lucky! These are highly prized by collectors.
- Calcite – This is probably the second most common mineral found in geodes. The crystals will usually be small and whitish in color. Testing with acid is the surest way to identify calcite.
- Pyrite – If you’ve found a geode with what looks like gold inside, you can be sure it’s pyrite. These crystals are typically cubic and make for great display pieces
- Chalcedony – A microcrystalline variety of quartz, this will sometimes form in geodes and have a bumpy or bubbly look to it.
There are many other minerals which can form inside of geodes and it will really just depend on the location you found yours in. Every geode is different, and the quality of the crystals may vary significantly between specimens even amongst geodes from the same location.